 TONELOUPE
How to fix skin tones in video: a colorist's checklist
Skin is the one thing in the frame every viewer is calibrated to. Nobody knows what your wall's beige should look like — everyone knows when a face is off. Here's the order of operations that fixes it, and the traps that keep it broken.
First, name the failure
“Skin looks wrong” is usually one of four specific failures. Diagnose before you touch a knob:
- Orange / Cheeto skin — over-saturated and pushed warm; the teal-orange preset era's signature injury.
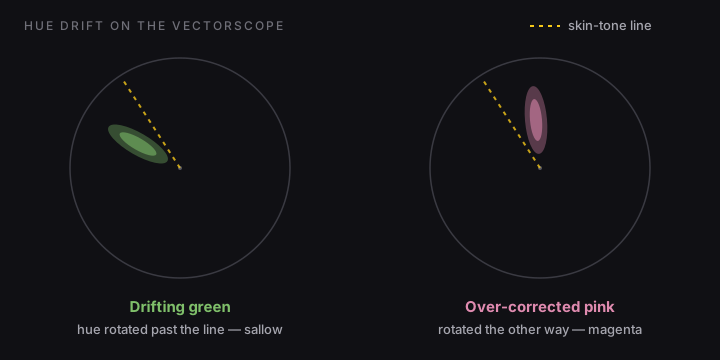
- Green / sallow skin — fluorescent or LED location light, or a tint slider that never got checked. Reads as “sickly”.
- Pink / magenta skin — the over-correction of green; also what heavy beauty filtering tends to leave behind.
- Plastic skin — hue may be fine but saturation and contrast on the face are crushed (over-denoised, over-smoothed).
The checklist, in order
1. Balance the shot before you judge the skin
Most “skin problems” are white-balance problems wearing makeup. Find a neutral in the frame — gray card if you're lucky, otherwise concrete, white paper, a gray shirt — and balance so the neutral actually reads neutral on the RGB parade (three channels level). Only then look at skin. Fixing skin on top of a global cast means grading two errors against each other.
2. Put the skin on the vectorscope line
Isolate the face (crop the scope's input, or use a region scope) and check the trace against the skin-tone line — the diagonal between red and yellow that every complexion naturally sits on (full explanation here). Rotated toward green: pull tint toward magenta or use a hue-vs-hue curve on the skin range. Rotated toward magenta: the reverse. Small moves — skin hue errors are usually a few degrees, and a few degrees is all it takes to read wrong.
3. Set skin exposure deliberately
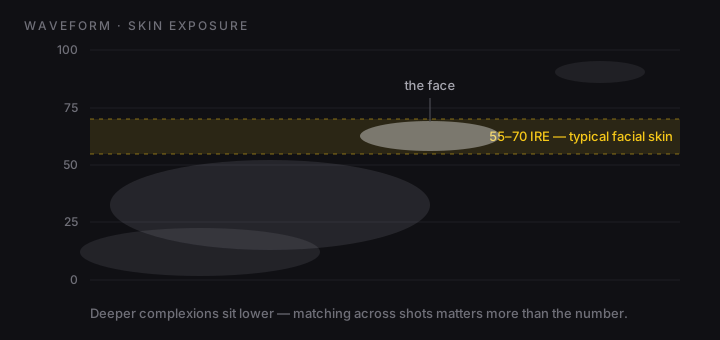
On a waveform, well-exposed facial skin generally sits in the upper-middle of the range — commonly around 55–70 IRE for lighter complexions, lower for deeper complexions; the point is consistency across shots, not one magic number. If the face rides at 45 IRE in one shot and 65 in the next, no hue work will make the scene feel matched.
4. Then, and only then, saturation
With hue on the line and exposure set, saturation is a taste decision. Two guardrails: skin should almost never be the most saturated thing in the frame, and deeper complexions carry more saturation naturally — desaturating a whole shot “to fix orange” often washes out darker skin first. If only skin is over-saturated, fix it with a keyed secondary, not the master saturation knob.
5. Re-check after every creative look
LUTs, film emulations and “looks” are hue rotations by definition. Apply the look, then measure skin again and pull it back onto the line with a secondary if it drifted. Look stays, faces stay human.
The traps that keep skin broken
- Your eyes adapt in minutes. After twenty minutes in a grade, a green cast is invisible to you — chromatic adaptation guarantees it. This is why objective reads (scopes, false color) beat “it looks fine to me” every single time. Rest your eyes; trust the trace.
- Whole-frame scopes dilute the face. Skin is often 5–10% of the frame; walls and wardrobe dominate the cloud, so a real facial drift barely moves the scope. Scope the face, not the frame.
- Matching the monitor, not the signal. An uncalibrated or Night-Shifted display will make you “correct” errors that aren't in the footage. Calibrate, kill the ambient color, or at minimum check on a second screen.
- Grading skin per-shot in isolation. The audience experiences the cut, not the shot. Check faces across the scene in sequence — consistency beats per-shot perfection.
Make the check continuous, not a ritual
Everything above works, but it has a workflow cost: crop, scope, un-crop, repeat — so in practice it gets done at the start of a session and then quietly stops. The fix is making the skin read ambient. That's what we built ToneLoupe for: a small floating loupe you park on the face while you work. Skin on the line reads yellow; the moment your grade pushes it green or pink, the face itself changes color — and the loupe's own vectorscope and RGB parade (reading only the face) tell you by how much. It floats over any app, so the same check works in your NLE, on exported stills, and on the client's review page in a browser.
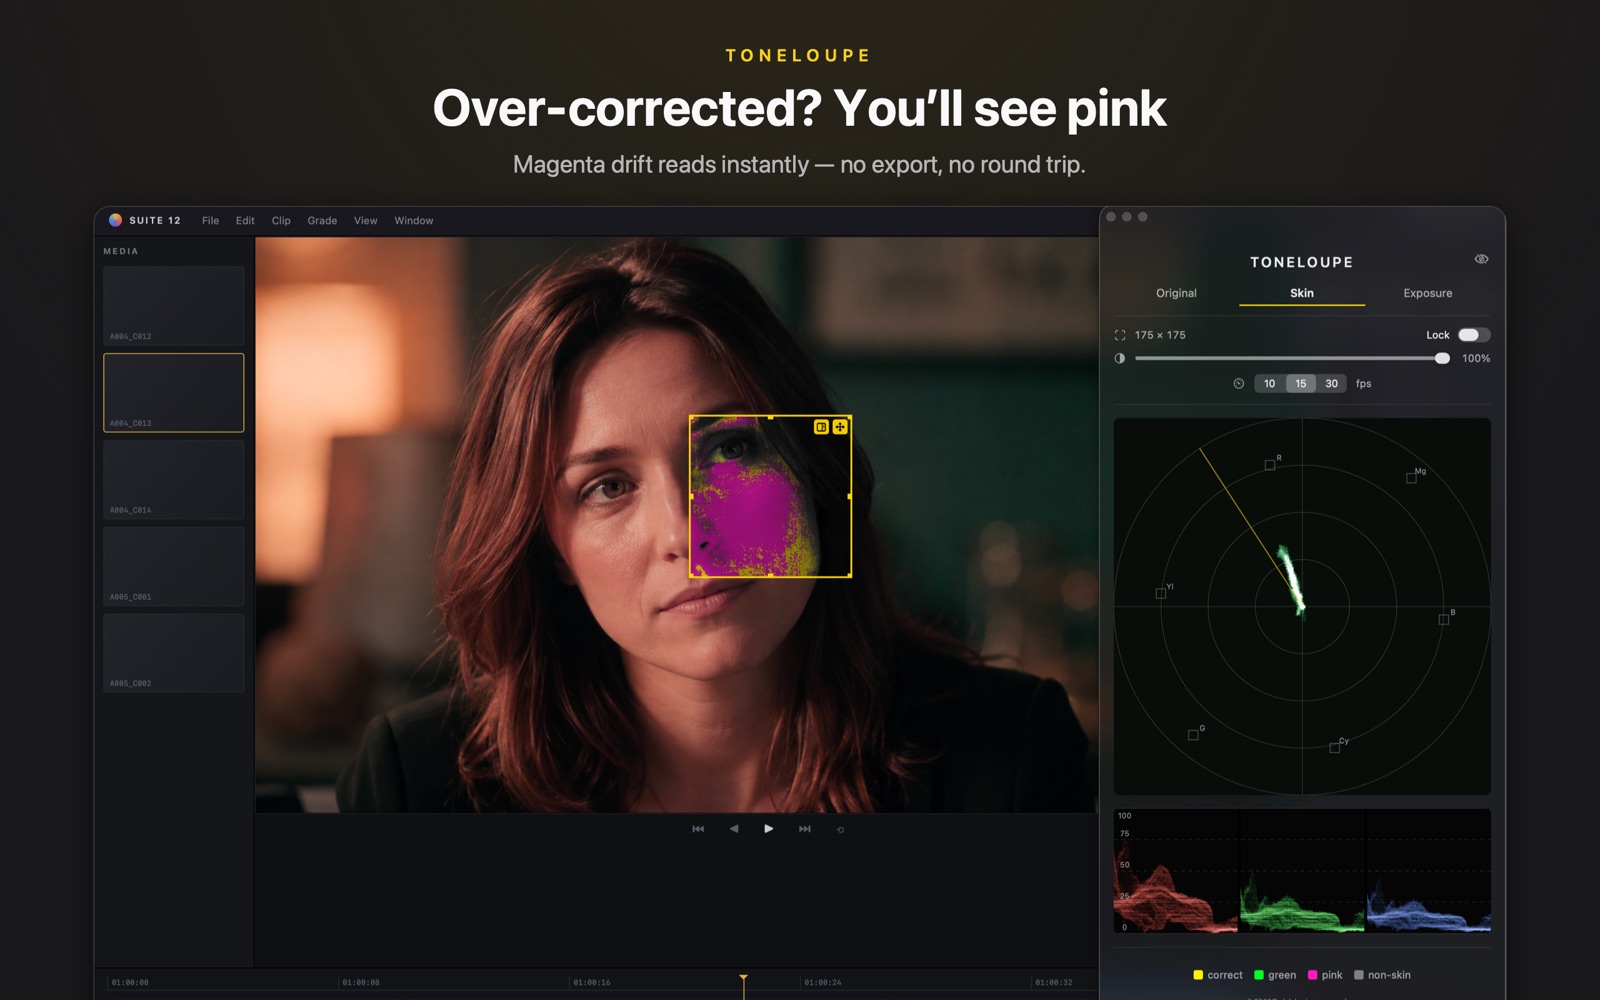

False color on the face, live vectorscope and RGB parade of just the loupe region — floating over any app on your Mac. ~3% CPU, no plugins, no signal chain.