 TONELOUPE
Does Lightroom have a vectorscope?
Short answer: no. Lightroom (and Lightroom Classic, and Adobe Camera Raw) ships a histogram, but no vectorscope, no RGB parade, and no false color. If you came here from a search, you already suspected that — here's what to do about it.
What Lightroom gives you instead
Video tools grew up around scopes because footage moves — you can't pixel-peep 24 frames a second. Photo tools grew up around the histogram and the eyedropper. So in Lightroom your options for judging color objectively are:
- The histogram — great for exposure and clipping, nearly useless for skin hue. A face drifting green barely moves it.
- RGB readouts — hover a pixel and Lightroom shows R/G/B percentages. Precise, but you're reading one pixel at a time and doing the interpretation in your head.
- The White Balance eyedropper — corrects a global cast if you have a true neutral in frame. It says nothing about whether skin itself has ended up where it should be after all your HSL, tone-curve and calibration moves.
None of these answers the question you're actually asking, which is: “is this skin tone still believable?”
Why a vectorscope answers it
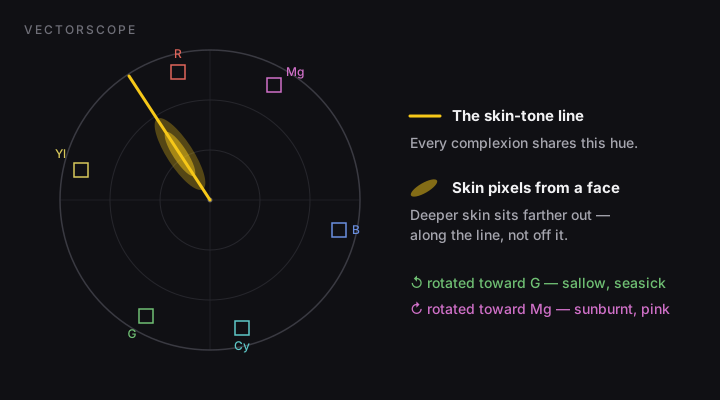
A vectorscope plots every pixel by hue (angle) and saturation (distance from center), ignoring brightness. Its superpower is a quirk of human biology: all healthy skin — every ethnicity, every complexion — falls along nearly the same hue line, between red and yellow. Melanin changes how dark and how saturated skin is, but barely changes its hue, because the color comes from the same two pigments (melanin and hemoglobin) in everyone.
That line is drawn on every broadcast vectorscope as the skin-tone line (you'll also hear “flesh line” or “I-line”). Colorists live by it: if the skin cloud hugs the line, faces read as natural; rotated toward yellow-green or toward magenta, something's wrong — even when your adapted eyes swear it looks fine. We cover it in depth in The vectorscope skin-tone line, explained.
Checking skin in Lightroom without a scope
If you want to stay purely inside Lightroom, here is the honest workflow:
- Fix white balance off a neutral first — gray card, white of the eye trick doesn't work (sclera isn't neutral), but a gray card or known-neutral surface does.
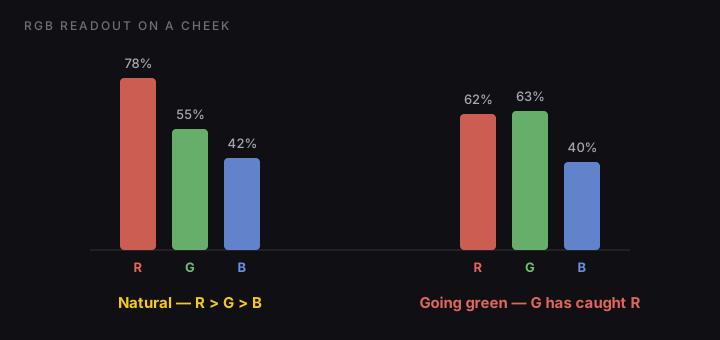
- Read RGB values on smooth, evenly-lit skin (forehead, cheek — avoid blush, beard shadow, hot highlights). For natural skin you want R > G > B, with G sitting roughly between R and B. If G ≥ R, skin is going sallow/green; if B creeps toward G, it's going pink/magenta.
- Sanity-check on a calibrated display, at a fixed brightness, after your eyes have rested. Chromatic adaptation is real: after twenty minutes of editing, a cast becomes invisible to you.
Floating a real vectorscope over Lightroom
The reason Lightroom will probably never ship a vectorscope is that it doesn't need to — on macOS, scopes don't have to live inside the editing app at all. Anything that can read the screen can scope it.
That's the approach we took with ToneLoupe: a small floating loupe you drag over the face in your Lightroom photo. It reads the pixels underneath in real time and gives you three things Lightroom doesn't have: a live vectorscope with the skin-tone line and an RGB parade (reading just the loupe region — the face, not the background), plus false color on the image itself — skin on the line reads yellow, drift shows as green or pink right on the cheek. The loupe's interior passes clicks through, so you keep sliding Lightroom's HSL sliders while the scope updates live.
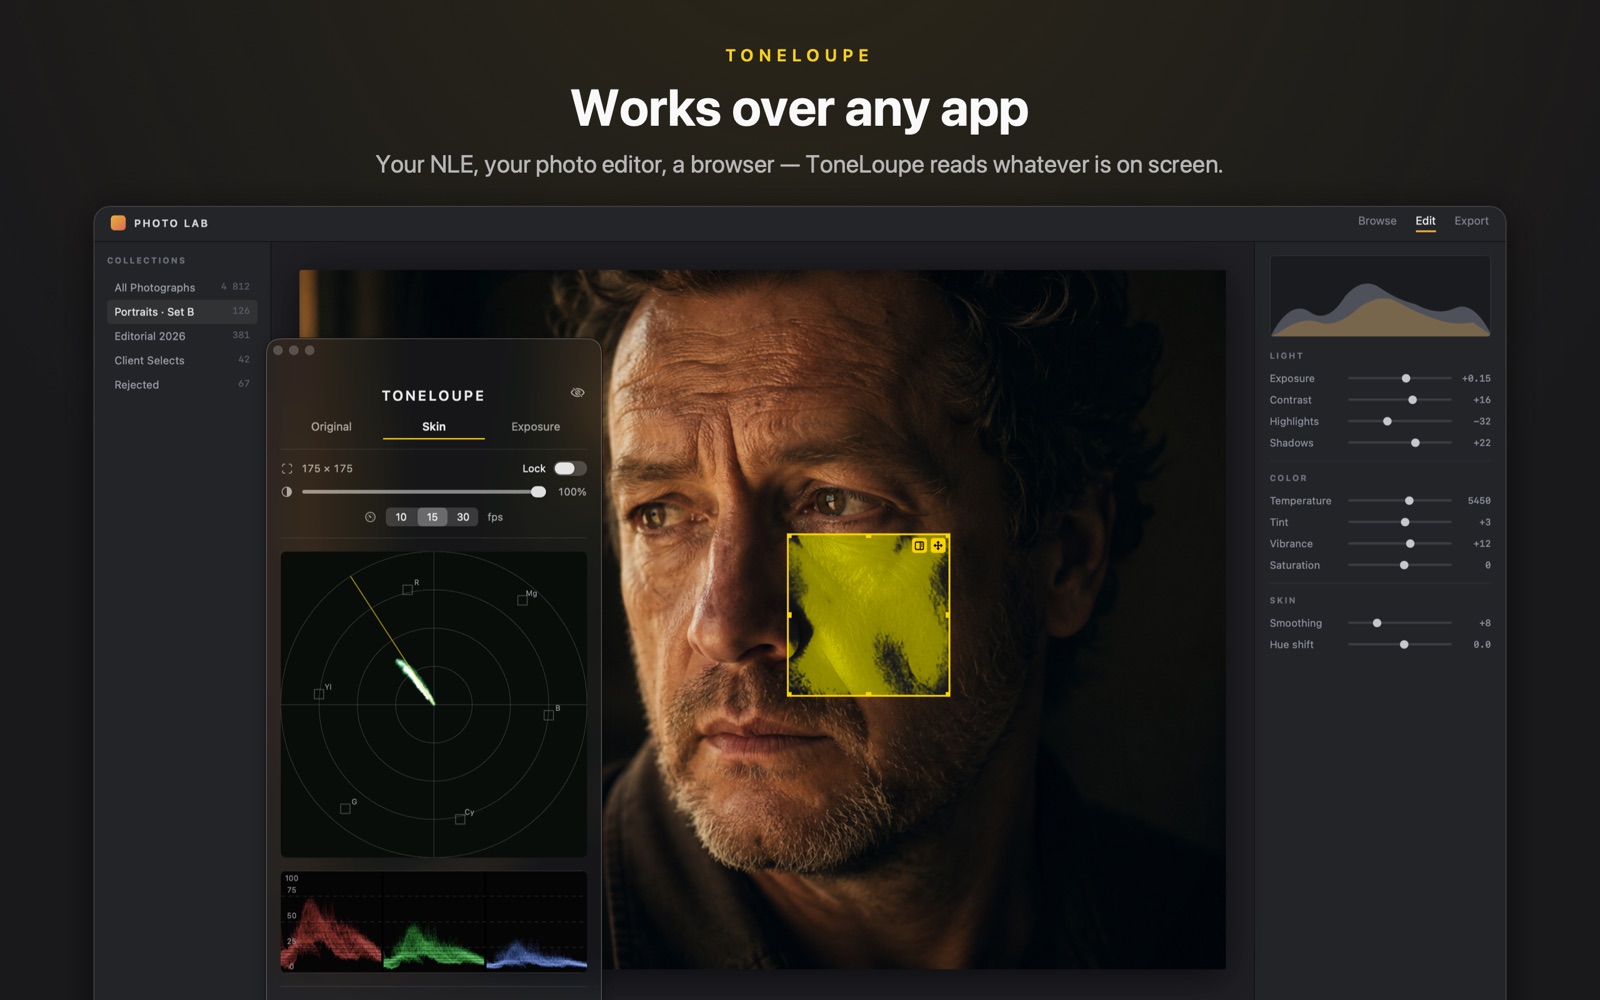
Because it reads the screen, the same loupe works over Capture One, Photoshop, a client's gallery in Safari — anywhere pixels are.

Drag the loupe onto a face in Lightroom — get false color on the skin and a live vectorscope + RGB parade of just that region. No plugins, no export, ~3% CPU.