 TONELOUPE
How to match skin tones across two cameras
A Sony A-cam, a Canon B-cam, one bride, and on every cut her face changes color. Multicam skin mismatch is the most-noticed grading failure there is, because the audience gets a fresh comparison every few seconds. Here's the order of operations that actually fixes it.
 ToneLoupe reads the same face on both cameras. Drag the
loupe between angles, match the numbers. Free 7-day trial →
ToneLoupe reads the same face on both cameras. Drag the
loupe between angles, match the numbers. Free 7-day trial →
Why cameras disagree about skin
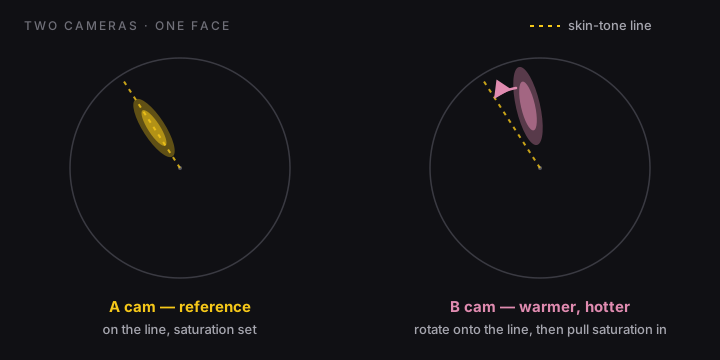
Every manufacturer cooks its own color science: Canon leans warm and flattering, Sony has historically drifted green-yellow on skin, phones add their own "vivid" seasoning. Two perfectly exposed cameras will still render the same face at slightly different hue angles and saturation, small differences on their own, glaring when intercut.
The matching order
- Pick the hero camera. Grade your best angle first and treat it as the reference. You match B to A, never both toward some imaginary middle.
- Neutrals first. On each camera, balance something that should be gray until the RGB parade's channels sit level. Half of "the cameras don't match" is just different white balance.
- Then skin hue. Compare the two faces on the vectorscope: both clouds should sit at the same angle, on the skin-tone line. Rotate B's skin range (hue-vs-hue, or tint in a pinch) until the angles agree.
- Then saturation and exposure. Same angle but one cloud reaches farther out = one face more saturated; pull it in. Then check the faces sit at the same IRE on the waveform (what number, and why the delta matters more).
- Verify in the cut, not the still. Play across the edit point both ways. A match that survives motion is a match.
The measuring problem, and the shortcut
The classic pain: your scope reads whichever frame is in the viewer, so comparing two cameras means bouncing between clips, holding the previous trace in memory, or juggling reference stills. ToneLoupe makes the comparison direct: put A-cam and B-cam side by side (two viewers, or exported stills, or a multicam grid) and drag the loupe from one face to the other. Same region-only vectorscope, same parade, seconds apart, and the false color gives an instant verdict on both: two faces reading solid yellow are matched where it counts.
Region-only vectorscope, RGB parade and skin false color. Drag it between angles in any NLE, or across stills in a browser.